Push notification is the most crucial feature of web-based application development. This service is a small push message and these notifications can be received on your desktop browser or mobile browser. We’re going to learn how to display pop-up push notifications. Here, we implement the push notification using the angular and FCM (Firebase Cloud Messaging).
Push Notifications
The user may need permission to receive new updates about any web applications. This permission is displayed as a pop-up notification. By accessing it, the user will receive new notifications from the site. Push notifications are used for this purpose. Push notifications are a way to make your app more interactive and automatically deliver dynamic content to the user.
This Push Notification service is displaying the quintessential information to the user like an alert message. The Push Notification Message will appear on your active browser as an alert message in an app or other service at any time or as the user expects. Push notification is a better way for users and apps to interact with each other.
Push notification is like an SMS or a mobile notification, but the notification only reaches the user if the app is installed. The mobile platform and the browser is support the push notifications.
Table of Contents
- Start New Angular project
- Angular Service Worker
- Subscribe Push Notifications.
- Show again the Allow/Deny Notifications
Start New Angular project
Let’s get start work!. First of all, we need an angular CLI to be installed globally.
npm install -g @angular/cliAfter it’s done, create a new angular project
ng new push-notification
cd push-notification
We need to use the firebase database so, we want to install this library.
npm install firebase @angular/fire --saveAngular Service Worker
Service Worker is a script that handles caching for an application and works in the web browser. Adding a service worker within the app is a step towards turning the application into a Progressive Web App (PWA). You need more details about it, go through this link https://angular.io/guide/service-worker-intro
We need to create some files into our app. Add the manifest.json file inside the src folder, Push notification use the Service work browser extension, which must be register into the manifest json file.
{
"gcm_sender_id": "YOUR-SENDER-ID"
}
After create the manifest.json file, add the link into the index.html file.
<head>
.....
<link rel="manifest" href="/manifest.json">
.....
</head>
Create firebase-messaging-sw.js file inside the src folder and the service worker access the firebase messaging.
importScripts('https://www.gstatic.com/firebasejs/3.9.0/firebase-app.js');
importScripts('https://www.gstatic.com/firebasejs/3.9.0/firebase-messaging.js');


firebase.initializeApp({
  'messagingSenderId': 'Your Sender Id'
});

const messaging = firebase.messaging()
we need to add these files inside the angular.json file
"assets" : [
"src/firebase-massaging-sw.js".
"src/manifest.json"
]
Subscribe Push Notifications
The Push Notification appears when the user opens a web application on the browser. Here we start the code; First, you need to ask permission to provide Push Notifications to the user. The push notification has two options, Allow and Deny. Selecting any of these will only take you to the next level.
We need to create a message.service.ts file to add the subscribe codes;
import { Injectable } from '@angular/core';
import { AngularFireAuth } from '@angular/fire/auth';
import { AngularFirestore } from '@angular/fire/firestore';
import { auth, firestore } from 'firebase';

// Device detector
import { DeviceDetectorService } from 'ngx-device-detector';

import { BehaviorSubject } from 'rxjs';

@Injectable({
  providedIn: 'root'
})
export class AuthenticationService {
  private _user: any = new BehaviorSubject(null);
  constructor(
    private afAuth: AngularFireAuth,
    private _afs: AngularFirestore,
    private deviceService: DeviceDetectorService
  ) {

    this.afAuth.user.subscribe(async user => {
      try {
        this.setUser(user);
        const token = return
this.messaging.requestPermission().then(() => {
      return this.messaging.getToken();
    });
        this.alert. this.messaging.onMessage((payload: any) => {
      this.showSuccess(
        `${payload.notification.title} : ${payload.notification.body}`
      );
    });
        this.updatePushToken(token);
      } catch (error) {
console.log("Error Message ", error);
      }

    });
  }
  private setUser(user: any) {
    this._user.next(user);
  }

  public get user(): BehaviorSubject<any> {
    return this._user;
  }


  /**
 * Update the User's push token
 * @param token string
 */
  public async updatePushToken(token: string) {
    try {
      const devices = await this._afs.firestore.collection('Devices').where('token', '==', token).get();

      if (devices.empty) {
        const deviceInfo = this.deviceService.getDeviceInfo();
        const data = {
          token: token,
          userId: this._user._value.uid,
          deviceType: 'web',
          deviceInfo: {
            browser: deviceInfo.browser,
            userAgent: deviceInfo.userAgent
          },
          createdAt: firestore.FieldValue.serverTimestamp()
        };

        await this._afs.firestore.collection('Devices').add(data);
        console.log('New Device Added');
      } else {
        console.log('Already existing Device');
      }
    } catch (error) {
      console.log("Error Message", error);
    }
  }

}requestPermission: The browser/device is asking for the user permission to receive the notifications of the particular applications. Firebase generates a token once the user accepts the permission. At the same time, this token is used as a reference to send a notification to the browser.
updateToken: If the token is not in the Firebase DB, add or update the token, user ID, and device details to the Firebase DB.
receiveMessage: This functionality helps the user to receive new messages
Configure your application
We need to set up our app for configuration and assets before launching our app
firebase: {
apikey: "Your appkey",
authDomain: "your domain name",
databaseURL: "your databaseURL",
projectId: "your projectId",
storageBucket: "your storageBucket",
meessagingSenderId: "your massageingSenderId"
}
After completing the compilation, run your app using ng serve. Once you open the browser, the browser will ask you for permission.
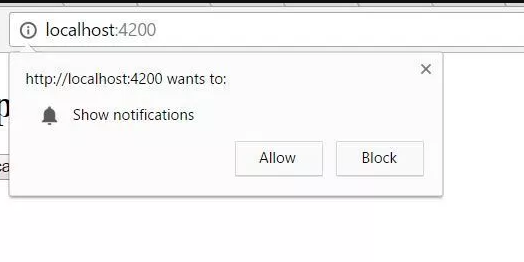
After clicking the Allow button, the browser will print a token on the console. Sometimes it takes time to print the token, but you get it.
Show again the Allow/Deny notifications
If you unknowingly click the Allow button in the push notification pop-up, the pop-up notification will never appear again.
If the user wishes to display the push notification pop-up again, try the following.
- Go to the chrome://settings/content/notifications
- A block containing all the websites blocked from issuing push notifications is listed below.
- User can delete site link from Allow list
- When the user reloads the site, the notification will appear.
Conclusion
In this part of the push notification tutorial, we learned how to subscribe to push notifications. Next, we need to learn how to send/receive notifications from our Angular app. This is explained in the next part of this tutorial. Definitely follow Part-2.
If you find it easy and useful to do, please share it!
Have Good Day!
Leave a Reply