Introduction
In today’s digital landscape, streaming media has become an integral part of our lives. With the rise of high-quality video content, the demand for seamless and reliable streaming experiences is at an all-time high. One popular streaming protocol that has gained widespread adoption is HTTP Live Streaming (HLS). We will explore how to implement HLS streaming using Videogular, an open-source video player library, in an Angular application. By the end of this tutorial, you will have a solid understanding of how to integrate Videogular and HLS streaming into your Angular projects.
What is HLS?
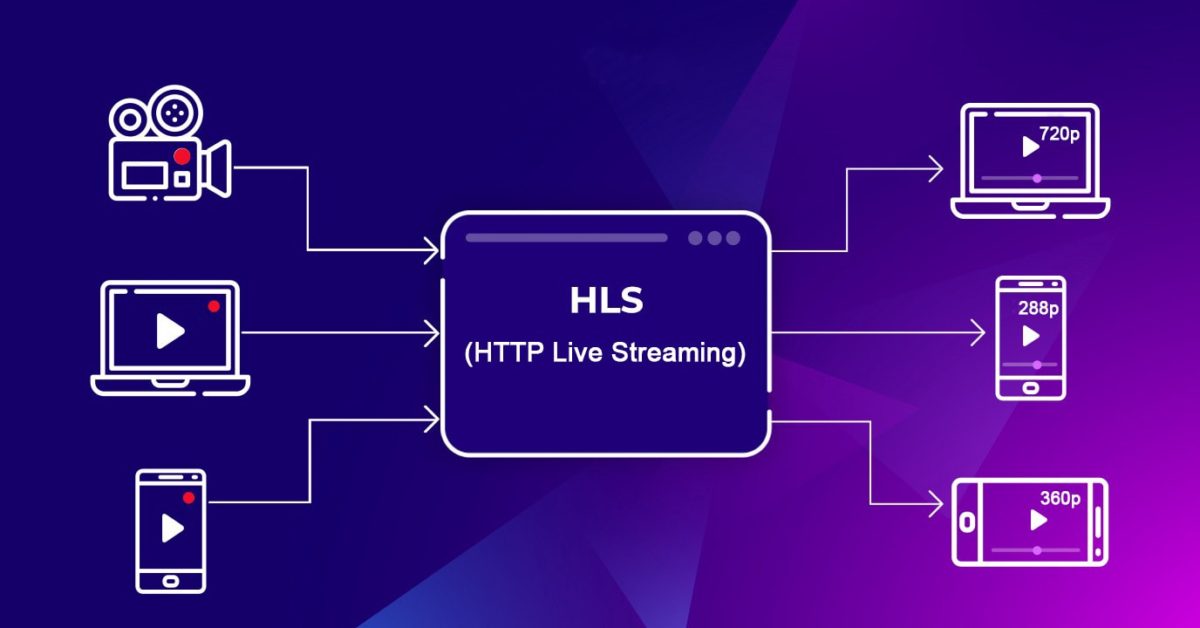
HLS, HTTP Live Streaming, developed by Apple for adaptive bitrate streaming formats that are supported on their devices and software, is an implementation protocol designed to implement adaptive bitrate streaming that support them on any platform. It was introduced by Apple in 2009. It uses m3u8 files to describe media streams and it uses HTTP for the communication between the server and the client. HLS is the default media streaming protocol on all iOS devices and can also be utilized on Android and web browsers. Over time, it gained widespread support.
HLS works similarly to MPEG-DASH in that it works by breaking up an overall stream into multiple HTTP file downloads, each download loading one short chunk from an overall transport stream. An extended M3U8 playlist provides clients with a list of streams encoded at various bit rates that they can watch.
Features of HLS
- Content protection
- Alternate audio and video
- Ad insertion
- Closed captions
- Fallback alternatives
- Fast forward and rewind
- Timed metadata
Technical Specifications of HLS
- Audio Codecs: MP3, AAC-LC, HE-AAC+ v1 & v2
- Video Codecs: H.264, H.265
- Merits: Adaptive bitrate, reliable, and widely supported.
- Latency: Though HLS initially provided latencies of 6-30 seconds, its Low-Latency HLS extension is now part of HLS and promises sub-2 second latency times.
- Playback Compatibility: Support all MacOS devices, Google Chrome browsers, Android, Microsoft, and Linux, several set-top boxes, smart TVs, and other players.
- Demerits: Quality of experience takes precedence over low latency.
HLS – Most Adopted Protocol
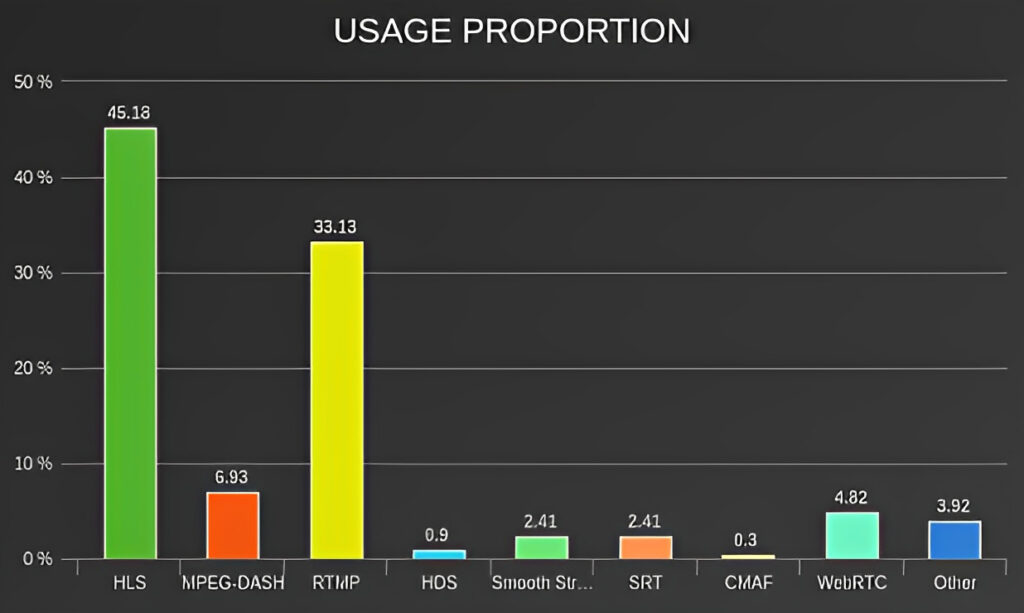
HLS has quickly become the go-to streaming protocol. According to the 2019 Video Streaming Latency Report, more than 45% of broadcasters use it. As given below, RTMP is also a popular choice, but most broadcasters, once when they reach the streaming server, they repackage RTMP streams into the HLS protocol. This helps ensure that the stream will work on different devices without needing viewers’ permission for downloads of plug-ins or add-ons.
Videogular2
Videogular2 is an open-source library designed to make the development of video players in Angular apps simpler, providing components and services to make adding video playback functionality into web apps simpler.
Videogular2 is built upon the HTML5 video element and uses Angular’s power to provide a modular and customizable video player, offering features such as playback controls, full screen support, custom themes, subtitles, cue points and much more.
Setting up an Angular Project
Prerequisites:
Prior to beginning, make sure that the following prerequisites are in place:
- Node.js and npm: Install Node.js, which includes npm (Node Package Manager), on your machine.
- Angular CLI: Install the Angular CLI globally by running the following command in your terminal or command prompt:
npm install -g @angular/cliStep 1: Create a New Angular Project
Open your terminal and navigate to the directory where you wish to create your Angular project and run this command in order to generate one.
$ ng new hls-streaming
$ cd hls-streaming
These commands will create a new Angular project and navigate you directly to its root directory.
Step 2: Install Videogular2
Start by opening your terminal or command prompt and navigating to your Angular project directory. Install Videogular2 using this command:
npm install videogular2 --saveStep 3: Install HLS.js
HLS.js is a JavaScript library that enables HLS playback on browsers that do not natively support HLS playback. To install as a dependency of your web application, execute this command:
npm install hls.js --saveStep 4: Import Videogular Modules
Launch your Angular project and open up its app.module.ts. Import all required Videogular modules:
import { BrowserModule } from '@angular/platform-browser';
import { NgModule } from '@angular/core';
import { AppComponent } from './app.component';
import { VgCoreModule } from '@videogular/ngx-videogular/core';
import { VgControlsModule } from '@videogular/ngx-videogular/controls';
import { VgOverlayPlayModule } from '@videogular/ngx-videogular/overlay-play';
import { VgStreamingModule } from '@videogular/ngx-videogular/streaming';
Add these modules to the imports array in your @NgModule decorator:
@NgModule({
  declarations: [
    AppComponent
  ],
  imports: [
    BrowserModule,
    VgCoreModule,
    VgControlsModule,
    VgOverlayPlayModule,
    VgStreamingModule
  ],
  providers: [],
  bootstrap: [AppComponent]
})
export class AppModule { }
Step 5: Create a Videogular Component
Create a component to host Videogular player. Execute this command to generate video-player component:
ng generate component video-playerStep 6: Implement HLS Streaming
Launch video-player.component.html file and add the following code:
<vg-player>
  <vg-overlay-play></vg-overlay-play>
  <vg-buffering></vg-buffering>
  <video #media [vgMedia]="media" controls>
    <source [src]="'http://path/to/your/hls/stream.m3u8'" type="application/x-mpegURL">
  </video>
</vg-player>
Replace 'http://path/to/your/hls/stream.m3u8' with the actual URL of your HLS stream.
Step 7: Style the Videogular Player (Optional)
Create custom styles with CSS in order to customize the appearance of the Videogular player and suit it to your design tastes. Open up video-player.component.css file and make changes therein.
Step 8: Use the Videogular Component
Add this code into any component template where you’d like a video player displayed:
<app-video-player></app-video-player>This will integrate Videogular player into your Angular app.
Step 9: Run the Application
Your Angular application can now be launched by entering this command into your terminal or command prompt:
ng serveThis command will compile and launch your application onto a development server, making your Angular project visible at http://localhost:4200 in your browser.
Conclusion:
We explored how to implement HLS streaming using Videogular in an Angular application. HLS provides adaptive streaming capabilities, ensuring smooth playback across different network conditions. By integrating Videogular with Angular, you can create engaging video applications with ease. Remember to explore Videogular’s documentation for additional features and customization options. Happy video streaming!
Looking for development support on HLS Streaming?
Feel free to ping us, we are happy to help out
Leave a Reply