In the Push Notification Part 1, we tried to understand how to subscribe to a push notification. We’ll cover the rest of this last Push notification
Here we use Firebase Cloud Messaging (FCM) to display the notification in your Browser or App. Firebase Cloud Messaging is cross-platform messaging. This is a great feature that we can message without any cost.
Let us use the platform and display the push notifications..,
Implementation: https://codecanyon.net/item/authentix-v2-lite-angular-firebase-ready-to-use-system/22377067
Content
- Setup Our Firebase Project
- Receive The Message
- Show Push Notification
We need to confirm that we were installed the following; Node, npm, Firebase, and check their versions.
Setup Our Firebase Project
Step 1 : Firebase CLI Reference
Firebase CLI is used to manage and deploy the Firebase project. Before entering the Firebase CLI We need to know How to generate the Firebase project looks like. So, follow the link Create a Firebase project
We need to install Firebase CLI
npm install -g firebase-toolsAfter completing the Firebase CLI installation, we must perform authentication. Go with this command.
firebase loginYou can connect to your local machine by logging into the firebase by running this command. You can access your Firebase project.
If you want to list your Firebase projects, follow this command
firebase projects:listRun the following command in your application directory to initialize your new Firebase project.
firebase initAfter completing the initialization, Firebase automatically creates two files: firebase.json, .firebaserc
Next, we need to open our project folder and then you will see a new folder called Functions. Open a terminal inside the Functions folder and run the below command.
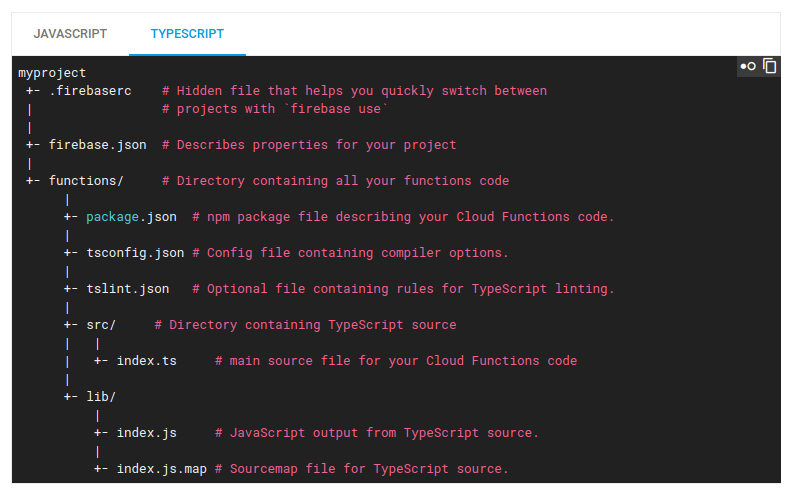
npm install firebase-functions@latest firebase-admin@latest --saveThis command used to update the firebase version. Your Firebase project folder looks like this after completing the update or initialization.
We did exactly what we needed to do in the Firebase CLI.
Now let’s move on to the next step
Step 2: Firebase Cloud Functions
Firebase Cloud Functions is a serverless framework. It automatically runs backend code to respond to firebase features and HTTPS requests enabled events. The Firebase app uses cloud functions in a unique way to meet their unique requirements.
Next, we need to import cloud functions and admin SDK modules within the index.js file. Follow the bellow codes;
// import cloud function
const function = require('firebase-functions');
//access the admin SDK
const admin = require('firebase-admin');
admin.initializeApp();
These lines load firebase-functions and firebase-admin modules and launch an admin application that can make cloud firestore changes. Where admin SDK support is available, it provides a powerful way to integrate Firebase with cloud functions, such as for FCM, Authentication, and Firebase Realtime Database.
Next we need to add the addMessage () function to the index.js file. Add the following codes;
exports.addMessage = functions.https.onRequest(async (req, res) => {
  const original = req.query.text;
  const writeResult = await admin.firestore().collection('messages').add({original: original});
  res.json({result: `Message with ID: ${writeResult.id} added.`});
});
addMessage () function is an HTTP endpoint. Any request to the endpoint is passed to the onRequest () callback in the Express JS-style request and the response objects.
makeUppercase() function, follow the code below;
exports.makeUppercase = functions.firestore.document('/messages/{documentId}')
    .onCreate((snap, context) => {
      const original = snap.data().original;
      functions.logger.log('Uppercasing', context.params.documentId, original);
      const uppercase = original.toUpperCase();
      return snap.ref.set({uppercase}, {merge: true});
    });
makeUppercase() function is find the new message and make the message in uppercase.
Step 3: Firebase Deploy
We can deploy our project into production or the local environment. We need to check the code above, so we’re going with this deployment. We can deploy locally to use the command;
firebase deployAfter the whole Firebase setup, let’s move on to the next step.
Receive The Message
The last thing we did in Part I was to show the Allow button. Once the Allow button is clicked, popup notifications appear in the browser at any time. How to display popup notifications? Yes, this is what we should do next.
In Part 1 we already create a message.service.ts file. We need to get popup messages from Firebase so we can use receiveMessage (). Write the code below into the message.service.ts file;
receiveMessage() {
    this.messaging.onMessage(payload => {
      console.log('Message received. ', payload);
      this.currentMessage.next(payload);
    });
  }
receiveMessage() action is triggered when a new message is received.
Now we can use the functions in the App component or any other component you want to set up the messaging. When the user is actively using the app we want to show the notifications and inside the app its self, We don’t want to come from some external source which should be distracting. Next, we need to call the getPermission() and the receiveMessage() function. So here we use the app component and write the bellow code inside the app.component.ts ;
import { Component, OnInit } from "@angular/core";
import { MessagingService } from "./messaging.service";

@Component({
  selector: "app-root",
  templateUrl: "./app.component.html",
  styleUrls: ["./app.component.css"]
})
export class AppComponent implements OnInit {
  message;

  constructor(private msgService: MessagingService) {}

  ngOnInit() {
    this.msgService.getPermission();
    this.msgService.receiveMessage();
    this.message = this.msgService.currentMessage;
  }
}
And the HTML part, write the bellow code inside the
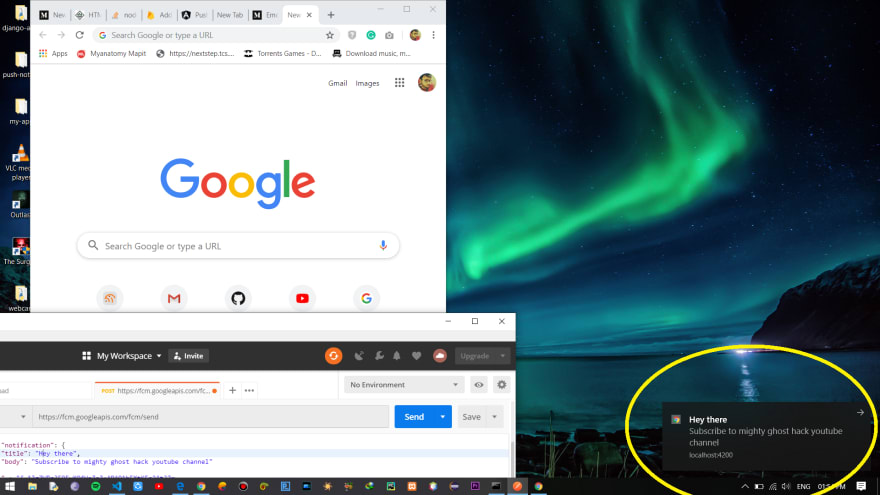
{{ message | async | json }}Now run your project using the ng serve --o command. Open the browser and ask your permission. If you click on the Allow button you will get popup notifications.
Yes, We did it..!
I hope you understand and like the angular project to receive the Push Notification.
Have a good day!
Leave a Reply