
Introduction:
Razorpay, a popular payment gateway solution, offers simpler integration with ExpressJS, a fast and minimalist web application framework. By combining these two powerful tools, businesses ensure transaction security, and improve customer satisfaction. In this blog post, we will explore the integration of Razorpay Payment Gateway and discuss its benefits and implementation.

Razorpay, as already mentioned is a popular payment gateway solution in India that provides businesses with a secure and hassle-free way to accept online payments. It supports multiple payment methods, including credit cards, debit cards, net banking, UPI, and digital wallets. Razorpay also offers a robust set of APIs and SDKs that allow integration into web and mobile applications, thus making it a preferred choice for many businesses.
Why choose ExpressJS for Razorpay?
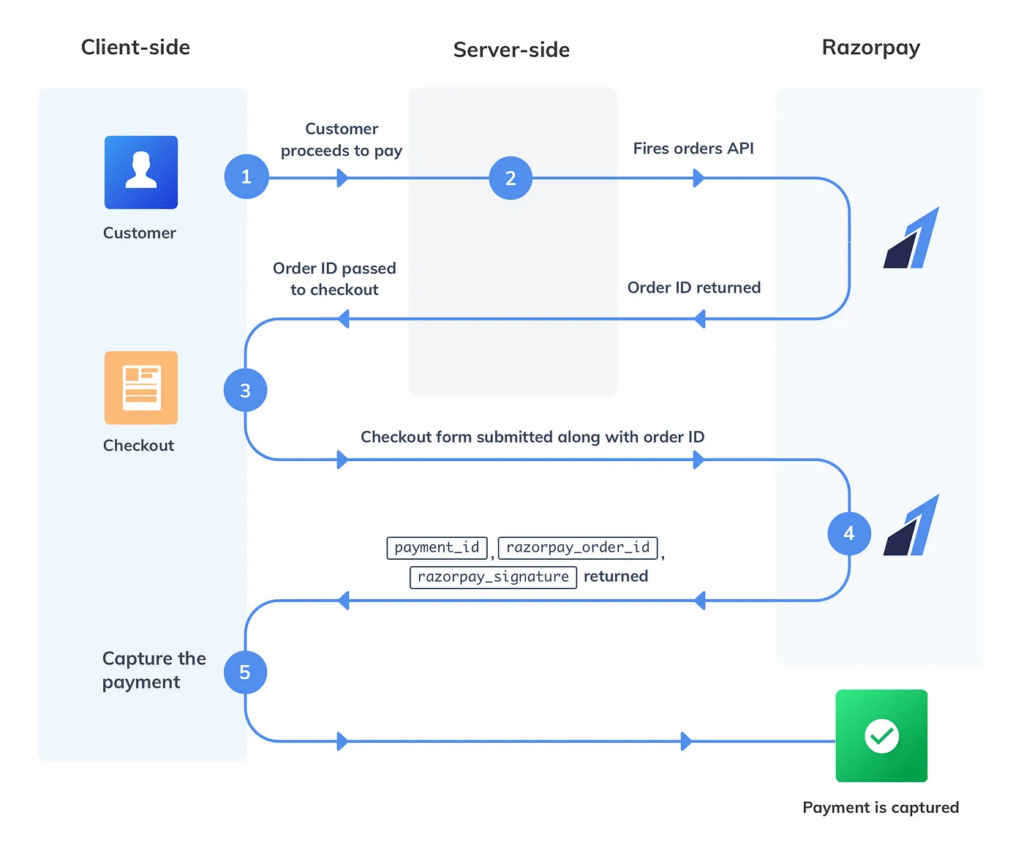
ExpressJS provides a simple and flexible approach to building web applications and APIs, making it easy to handle payment requests and responses. It also offers a wide range of middleware and plugins that can further enhance the functionality and security of the integration process. Below image shows the transaction flow.
Setting up the environment:
Before diving into the integration process, you need to set up your development environment. Ensure that you have latest Node.js and npm (Node Package Manager) installed on your machine. Create a new directory for your project and initialize it as a Node.js project using the command:
$ npm init -yInstalling and configuring Razorpay:
Open your terminal and navigate to your project directory. Run the following command to install the SDK:
$ npm install razorpayOnce the installation is complete, you can require the Razorpay module in your code and initialize it with your API credentials. These credentials can be obtained by creating an account on the Razorpay dashboard.
const Razorpay = require('razorpay');

const razorpay = new Razorpay({
  key_id: 'YOUR_KEY_ID',
  key_secret: 'YOUR_KEY_SECRET',
});
Replace 'YOUR_KEY_ID' and 'YOUR_KEY_SECRET' with your actual API credentials.
Creating a payment form with Express Node.js:
Now that you have Razorpay installed and configured, you can create a payment form in your ExpressJS application. Let’s start by creating an HTML form that collects the necessary details from the user, such as the payment amount, customer name, email address, etc.
<!-- payment.html -->
<form action="/pay" method="POST">
  <label for="amount">Payment Amount:</label>
  <input type="number" id="amount" name="amount" required>

  <!-- Add other fields as per your requirements -->

  <button type="submit">Pay Now</button>
</form>
In your Node.js application, create a route to handle the payment request:
// app.js

const express = require('express');
const bodyParser = require('body-parser');

const app = express();
app.use(bodyParser.urlencoded({ extended: true }));
app.use(bodyParser.json());

app.get('/', (req, res) => {
  res.sendFile(__dirname + '/payment.html');
});

app.post('/pay', async (req, res) => {
  const amount = req.body.amount;

  // Create a Razorpay order
  const order = await razorpay.orders.create({
    amount: amount * 100, // Razorpay expects the amount in paise
    currency: 'INR',
    receipt: 'order_receipt',
    payment_capture: 1, // Auto-capture the payment
  });

  // Redirect the user to the Razorpay payment page
  res.redirect(order.short_url);
});

app.listen(3000, () => {
  console.log('Server started on port 3000');
});
This code sets up an Express server and defines two routes: the root route (/) to serve the payment form and the /pay route to handle the payment request. When the user submits the form, the server generates a new Razorpay order and redirects the user to the payment page provided by Razorpay.
Handling payment callbacks:
After the user completes the payment on the Razorpay page, it will send a callback to your server to notify you about the payment status. You need to define a callback route in your Express application to handle this callback.
// app.js

app.post('/payment/callback', async (req, res) => {
  const orderId = req.body.razorpay_order_id;
  const paymentId = req.body.razorpay_payment_id;
  const signature = req.body.razorpay_signature;

  // Verify the payment signature
  const isSignatureValid = razorpay.validateWebhookSignature(
    req.headers['x-razorpay-signature'],
    req.rawBody,
  );

  if (!isSignatureValid) {
    return res.status(400).send('Invalid payment callback');
  }

  // Update your database or perform other actions based on payment status

  res.status(200).send('Payment callback handled successfully');
});
In this code snippet, we define a /payment/callback route to handle the callback request from Razorpay. We extract the order ID, payment ID, and signature from the request body. We then validate the signature using Razorpay’s validateWebhookSignature method to confirm the authenticity of the callback. If the signature is valid, you can update your database or perform other actions based on the payment status. Finally, we send a response indicating the successful handling of the callback.
Implementing transaction verification and security:
To provide security for your transactions, Razorpay provides a webhook feature that allows you to verify the authenticity of payment-related events. To set up a webhook, you need to configure the webhook URL in your Razorpay dashboard and handle the webhook callback in your Express Node.js application.
// app.js

app.post('/payment/webhook', async (req, res) => {
  const orderId = req.body.payload.payment.entity.order_id;
  const paymentId = req.body.payload.payment.entity.id;

  // Fetch the order details from your database

  // Verify the payment details and update your database

  res.status(200).send('Webhook received successfully');
});
In this code snippet, we define a /payment/webhook route to handle the webhook callback from Razorpay. We extract the order ID and payment ID from the request body. You can then fetch the order details from your database and perform verification checks on the payment details. After verifying the details, you can update your database accordingly.
Testing and sandbox environments:
The sandbox environment allows you to simulate payment scenarios and test the integration without incurring any real charges. You can obtain sandbox API credentials from the dashboard and use them in your development environment.
To switch to the sandbox environment, modify the initialization of the Razorpay instance as follows:
const razorpay = new Razorpay({
  key_id: 'YOUR_SANDBOX_KEY_ID',
  key_secret: 'YOUR_SANDBOX_KEY_SECRET',
});
Replace 'YOUR_SANDBOX_KEY_ID' and 'YOUR_SANDBOX_KEY_SECRET' with your sandbox API credentials.
Conclusion:
We discussed the integration of Razorpay Payment Gateway with ExpressJS. We explored the step-by-step process of setting up and implementing the integration.
Still confused?
Our team has already integrated Razorpay in couple of applications. If you need our assistance, feel free to ping us
Leave a Reply