Let’s assume that you are building an application. and this app needs certain libraries, dependencies, or maybe OS-level features. Now, to execute your application on a machine, you need a specific version and libraries. So, what if a team member wants to run your application on their machine? They would have to install those specific versions and libraries. And eventually, when trying to install those versions, there will be version conflicts. In this post we will be showing how to create a Docker container for NodeJS and MongoDB
What is Docker?
Docker is very popular nowadays because of its containment behaviour. It has a containerization platform for developers to build, share, and run any application anywhere. Containers are lightweight packages that contain everything necessary for running an application, including code, dependencies and configuration settings. Docker containers are highly portable, making it easy to run the same application across different environments, including development, testing, and production.
The main benefits of Docker is its compatibility with any project . Whenever you are working with any language like Python, Java, etc.., Docker can help your development workflow more accurate and ensure that your applications are highly portable and easy to deploy. Docker containers are highly isolated from each other, which means that they can run multiple containers on a single host without the risk of conflicts or interference between them. This makes it easy to run complex, multi-component applications that would be difficult to manage using traditional deployment methods.
What are the key features associated with Docker:
- Dockerfile
- Docker Images
- Docker Containers
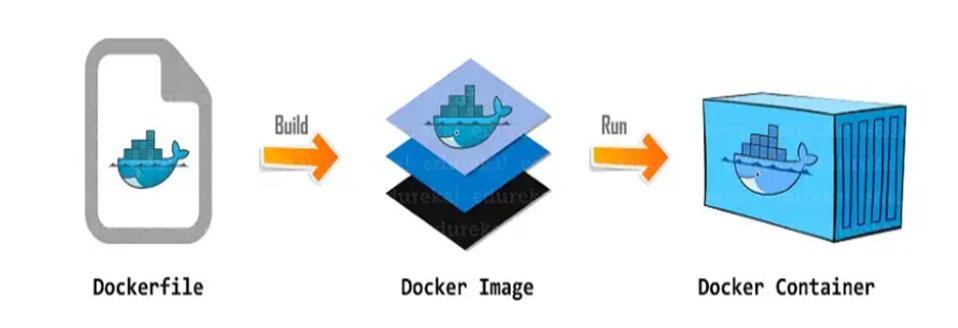
Dockerfile: It is a text document with a list of commands which, when run from the command line, allow an individual to build an image.
Docker Images: It is something similar to the template. Typically it is used to build Docker containers, and it is a read-only template and it is a building block of a Docker container
Docker Containers: Docker containers provide an instance of running Docker image. These containers hold the complete package required to execute the application, and these are basically ready-to-use applications created from Docker images.
Working of Docker
Docker is an open-source containerization platform. It has a major 3-part process for dockerization: first, we create a docker file, which is the basic building block of this process, and this file has a list of commands for creating our docker image. After that, we run that image, and we get a Docker container.
And the Docker current data they are going to simply create can say it contains the entire application and works like a containerized platform, so we don’t need any other dependencies here, and the entire platform application can be executed on any platform as required.
Containers vs Virtual Machine

VM
Virtualization phenomenon gives you to share a system with many virtual environments.The hypervisor controls hardware resources and allocates them accordingly between physical environments and virtual ones, with resources being distributed as necessary between them. Resources are allocated directly from physical environments to VM’s.
DockerContainer
We still have hardware and some kind of host operating system in a Docker container. But instead of a hypervisor, we have a container engine. And it does this by exposing parts of the host operating system to the partitions; the partitions only contain the dependencies and libraries required by the application. They don’t contain an entire Operating system.
Demo of Dockerizing Node-Mongo application
1.Download Docker
The initial setup for the dockerization is that you first need to ensure that the docker is already installed on your system or not. If it has not been downloaded, please download it from their official website and create an account there.
2.Download Node
The second step is to determine whether or not Node is installed on your system. If Node is not installed on your system, please download the latest version of Node from their official website.
After the installation of Docker and Node, create a new folder in the directory. Now let’s test running our app in the terminal.
npm init
npm install express
Create a new file named server.js, which is our Express app, and create the initial setup.
const express = require('express');
const app = express();
const {postUser,getUser} = require('./controller/formcontroller');
const bodyParser = require('body-parser');
const { db } = require('./database/database');

const PORT = 8080;
db();
app.use(bodyParser.json());
app.get('/', (req, res) => {
  res.send('Hello World');
});
app.post('/users',postUser);
app.get('/users',getUser)

app.listen(PORT, () => {
  console.log(`App Running on ${PORT}`);
});3.Connecting MongoDB to Nodejs Application
Integrate the database into the node.
const mongoose = require('mongoose');

const db = async()=>{
         mongoose.connect('mongodb://mongo:27017/forms')
            console.log('Connected to MongoDB');

}
module.exports = {db}4.Setup Docker file
The next step is to create a docker file in your app, using the “touch” command as shown below.
touch DockerfileIn this Dockerfile, you need to define what image you are going to build from and create a directory to hold the application code inside the image. Install your app dependencies using npm.
Finally, pack your app source code inside the Docker image using the “COPY” instruction and expose it to port 8080.
To run your application, the “CMD” command should be used, such as node server.js in this case.
Dockerfile look like this:
FROM node:16

// Create app directory
WORKDIR /usr/src/app

// Install app dependencies
// A wildcard is used to ensure both package.json AND package-lock.json are copied
// where available (npm@5+)
COPY package*.json ./

RUN npm install
// If you are building your code for production
// RUN npm ci --only=production

// Bundle app source
COPY . .

EXPOSE 8080
CMD [ "node", "server.js" ]
Build the image and run that image it will give you a container.
Ignoring files in the container
If you want to ignore some files in the container, use dockerignore. This file, like the.gitignore file, Docker allows users to provide a list of files or directories which should be ignored during its build process. This can come in very handy in certain instances.
The command for creating a .dockerignore file is:
touch .dockerignoreadd these two lines in this dockerignore file
node_modules
npm-debug.log
After successful creation of Dockerfile,Then, go to your project directory which has your Docker file, and run the following command to build the Docker image.
docker build -t docker_image_nameThe -t flag allows you to tag an image, making it easy for searching using the Docker images command.

After successful creation of Docker image run that image using below command
docker run -p 8088:8080 -d docker_image_name5.Create Docker Compose configurations
Now let’s use Docker Nodejs MongoDB with this command provided below to run it successfully. Compose allows us to easily create a YAML file to define our services, and with just one command we can spin up or shut down everything at any time. By using this type of file, you can easily handle multiple containers in a single application and run them with a single command.
- Create the file named “docker-compose.yml” in the same directory as the “Dockerfile” you created.
version: '3'
services:
  app:
    container_name: docker_test
    build: .
    ports:
      - "8088:8080"
    links:
      - mongo
  mongo:
    container_name: mongo
    image: mongo:6.0
    volumes:
      - ./data:/data/db
    ports:
      - '27017:27017'
Now, Launch the Docker Nodejs MongoDB application using this command below:
docker-compose up 
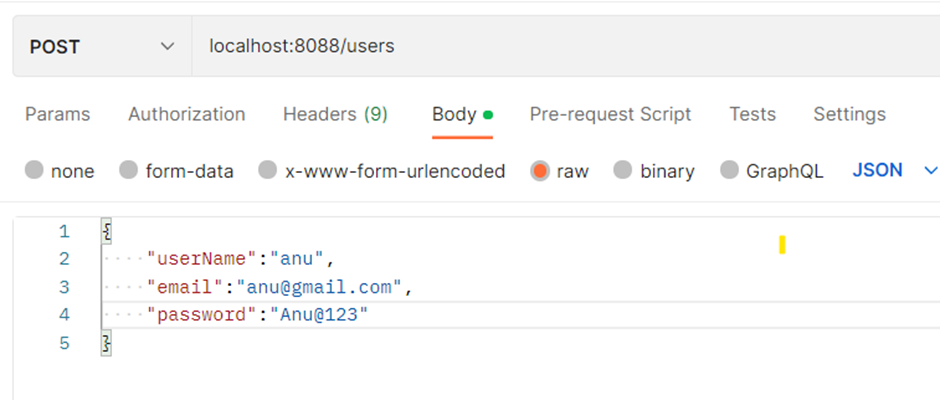
After the successful connection. we can call the api’s
here we call the 2 api’s by using post and get methods
const express = require('express');
const Form = require('../schema/form');

const postUser = (req, res) => {
    const newUser = new Form(req.body);
    newUser.save((err, newUser) => {
        if (err) {
            return res.status(400).json('failed to add user')
        }
        return res.json({
            message: "successfully added user",
            newUser
        })
    })
}
const getUser = async (req, res) => {
    try {
        const userData = await Form.find()
        res.send(userData)
    } catch (e) {
        res.send(e)
    }
}

module.exports = {
    postUser,
    getUser
}
And then update the code in server.js
After the successful creation of the API, we can call this API in Postman and get data in the database. Here, we are using MongoDB, so data will get into Mongo’s collection.

Summary
Here we looked up the dockerization of a simple application, what Docker is, why we need it, and how to dockerize an application from scratch. Also, why is it important for modern organisations? And the example in this article aims to demonstrate the dockerization of a node-mongo application. Throughout our discussion, we covered the various valuable steps involved in creating this Docker image for dockerizing the application. By adopting Docker and related technologies, organizations can significantly enhance the scalability and efficiency of their application development workflows, leading to faster time-to-market and better overall outcomes. it helps to simplify the deployment process, also ensure consistency across different environments, and reduce the errors and conflicts. With Docker, developers can pack their applications into containers that can be run on any platform without any dependencies. This makes it easier to scale and maintain the application, as well as improving its security.
Our Docker series has come to a conclusion, That’s all I have for the topic. Thanks for reading! If you enjoyed ,drop us a few claps below.
Now that you’ve learned to containerize an Express Application, you may also take a look on scaling it horizontally.
Leave a Reply